And don't forget to pop by and see me at the store, wetcoastwools.com. Because yarn is always a good thing.
Tuesday, December 30, 2014
I've Moved!
After almost two years of blog silence (except for that one random post in 2013), I have decided to move to a whole new blog. Come visit me at my new site, glendamadethis.wordpress.com.
Sunday, February 17, 2013
The "M" Word
Anyway, we had a family dinner at my parents' house last night, and we used the opportunity to make the switch - the knit and crochet toys that I had made for Max in the past, but borrowed back for my Holiday window, in exchange for the christening set. Gavin brought the set in the special storage box I had given them along with the set. A stiff cardboard box, made from acid-free card, and reinforced with metal on the corners. Inside, the set was lovingly wrapped in the acid-free, stain-free tissue paper. I peeled it back carefully, and lifted up the gown... and right in the middle was a little brown moth carcass! All that concern for staining and decay, and darned if it didn't even occur to me to think about moths! Further inspection revealed a few more of the little decayed cocoon thingies, so I definitely wasn't seeing things the first time. Ugh. Just the thought of what those little beasties can do to yarn makes me feel ill!
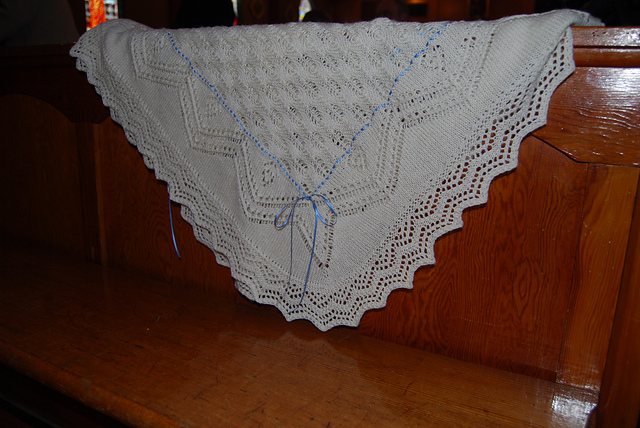
Paranoid as I am, I left the giant (and now potentially infested) box with my folks, and brought the christening set home in a plastic bag. I'll have to deal with the box later - no way was that box getting anywhere near to my yarn stash! I just finished inspecting the set - gown, shawl, bonnet, and booties - very carefully, and have stashed it all in my freezer after first putting it into some spare store bags I had kicking around. In a week I shall take it all out again, let it "thaw" for a few days, and then repeat the 'freeze-thaw' cycle a few more times. I couldn't see anymore moth remains in the set, but I'm not taking any chances!
 |
| The mark of a true knitter - knitwear (or yarn) in the freezer, tucked in next to the (apparently expired!) pie crusts and frozen berries! |
So far, it looks like we've been lucky - I couldn't find any signs of holes or chewed up fibres. Perhaps this particular species of moth wasn't overly impressed by this wool/silk blend. When I wash the set in a few weeks' time, I will inspect it all again. Fingers crossed that there isn't any damage - what leftover yarn I had has long since been dyed a striking blue-green color (both the laceweight and the DK), so finding extra yarn for darning could prove a challenge!
That reminds me... I really should put that beautifully dyed yarn to good use! ;)
Friday, August 10, 2012
No more space?!
Suddenly Google has decided that I have maxed out my photo space quota, and that if I want to upload more photos I have to either pay them money or delete some old photos. I honestly can't decide which option is worse!
So instead of photos, I'm going to offer you a link instead... A link to that new 'project' that has been taking up all my time recently... A link to the website of my new yarn store!
www.wetcoastwools.com
In some ways its feels like I have been working on this for ages, and yet at other times I feel like its all happened almost overnight. Funny how several months of hard work, once finished, seem to have passed by overnight! Thank goodness I have Mike around to help me keep my head on straight!
Needless to say, I probably won't be blogging here quite as much anymore, at least for the foreseeable future. Instead, come follow our in-store antics on the store blog, http://wetcoastwools.com/blogs/news. Or, if you're in Vancouver, stop by and say hello! :)
Thursday, June 21, 2012
catchup
I really have fallen off the blogging wagon recently. I blame in on A Certain Project that I'm doing right now, which is eating up all my time and all my mental capacity - with the result that when I do have time, I have zero mental and/or physical energy left for knitting. But its a fun project so I can't complain. I'll tell you all about it soon, I promise. (wait, who actually reads this blog anymore? maybe you already know what that project is... is it possible that I lost all my non-local readers through lack of posting?!)
Anyway, for lack of anything more entertaining to post, I thought I'd show you the bits I have been working on. My good friend Tiffany had a little baby recently, so of course some baby knitting was in order.
 I decided to make her a Newborn Vertebrae using some pretty blue and rainbow sock yarn. Its meant to be a frontless cardigan to keep the baby warm, but not overheated - plus it makes for less fabric between you and the wee-one when they snuggle against you. This was such a great pattern - I used slightly larger needles than recommended, and it ended up a little on the big side for Tiff's wee one (which means extra wearing time - yay!). The designer has released a pattern that goes all the way up to adult size, but only the newborn one is free.
In an attempt to do some (very much needed!) stashbusting (and cure a rather tenacious bout of startitis), I've also been trying out more baby patterns. This one is the Sunnyside cardigan from Tanis Fibre Arts (the yarn is from KnitPicks).


The last thing I'm doing right now is a surprise for someone, so you only get a sneak peek:


Anyway, for lack of anything more entertaining to post, I thought I'd show you the bits I have been working on. My good friend Tiffany had a little baby recently, so of course some baby knitting was in order.

In an attempt to do some (very much needed!) stashbusting (and cure a rather tenacious bout of startitis), I've also been trying out more baby patterns. This one is the Sunnyside cardigan from Tanis Fibre Arts (the yarn is from KnitPicks).

Makes a cute cardigan, but I found the instructions a little confusing... but maybe its my fault for miscounting the cable pattern, and then not checking with the pattern photo to see whether or not to end the raglan cables after separating the sleeves... :) This is supposed to fit a 6-12 month old, but again I went up a needle size, so it may well fit a larger child. I had 200g of this yarn and this sweater used less than 100g. I'm now making a second cardigan with it (different pattern), but I think I'll have lots of leftovers from it.
When I first started knitting, I went to Touch of Wool in Dunbar (now closed) and bought enough tweedy blue DK yarn to make myself a sweater. Not surprisingly, I never made that sweater, and the yarn languished in my stash for something like 11 years. In that time I used enough bits of it in various projects and swatches to reduce it down to kid-project only quantities - which made me decide that it would make a very cute rustic-style pullover. Like this one, from a Sirdar pattern I'd seen at Homecraft:

Turns out there was actually more there than I'd calculated - I made the sweater first (size 3-6 months, supposedly) then the hat (my own design), then the booties (modified from a Drops pattern), and I still have a small amount left over! I think this yarn wants to stick around forever!
The last thing I'm doing right now is a surprise for someone, so you only get a sneak peek:

More details once it has been sent off to its intended owner! :)
Oh, I've also been desperately trying to finish the next installment of my correspondence course on Knitting Design. Look at all the pretty (albeit acrylic!) swatches!

Sunday, May 20, 2012
Leeky Soup
Today's wet weather - and the fresh leeks in the grocery store - called for some nice hot soup for dinner.

Leeks are a very underrated vegetable in Canada... I used to buy them all the time when I lived in Newcastle, but here they tend to be a once in a while purchase.
What's that Welsh holiday where everyone wears a leek pinned to their lapel? I think its time we started doing that here!
ETA: the photo won't post using my Blogger App, so I had to add it after... oh, and if you want to make Leek & Potato soup too, I use Jaime Oliver's recipe from this book. Its a brothy version (which is healthier than a creamy one, I think), but you can puree it if you want to to make it nice and thick.
ETA a little more: In the end we decided to puree the soup in the blender, and then I topped it with some crème fraîche in the fridge. Crème fraîche is so yummy, and is yet another underrated item here in Canada - it costs a fortune here too, which makes no sense at all.

Subscribe to:
Posts (Atom)